
AutoLifts
Practical Information for Owners and Prospective Owners of the
Single Column UTV & Mower Storage / Service Lift
| Learning Center Document | AL-LC-205 |
| Title | Priming the Power Unit |
| Category | Operation |
| Revision | 1.0 |
| Originally Published | August 2026 |
| Last Revised | August 2026 |
Priming the Power Unit
The power unit may occasionally require priming if air enters the hydraulic system. A common symptom is that the motor runs normally, but the lift will not raise because the pump is not moving hydraulic fluid.
Priming Procedure
Step 1 — Locate the Check Valve
Locate the check valve and flush plug on the power unit manifold. The check valve is located to the left of the lowering valve.
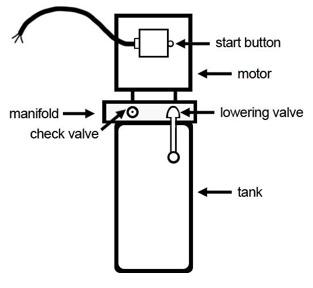
Figure 1 — Power unit priming procedure.
Step 2 — Loosen the Check Valve Plug
Using an Allen wrench and a shop towel, cover the plug to catch any hydraulic fluid that may escape.
Loosen the check valve plug approximately 1/2 to 2 turns to allow trapped air to escape.
Step 3 — Prime the Hydraulic System
Press the START button for approximately one second, then release it for approximately three seconds.
Repeat this procedure until the power unit begins pumping hydraulic fluid.
Step 4 — Tighten the Check Valve Plug
Once the power unit begins pumping fluid, tighten the check valve plug securely.
Let's Talk
If you have questions about operating your lift or need assistance with your power unit, we would be happy to help.
Related Learning Center Documents
- Lifting Procedure
- Safety Locking System
- Maintenance Schedule
- Hydraulic Oil
Notice
This Learning Center Document is intended as general guidance. Always follow the current instructions supplied with your lift. Specifications and procedures may change without notice.
Revision History
| Revision | Date | Description |
|---|---|---|
| 1.0 | August 2026 | Initial publication. |
Learning Center Document AL-LC-205
Revision 1.0
© 2026 AutoLifts.com. All Rights Reserved.